
DIY keyboard stand to simplify my rig
 Looking for a sleeker, more attractive setup, I decided on a DIY keyboard stand. I had grown discontent with my rig at church for at least three reasons:
- It looked too “music gear-ish.” Ultimate Support Apex has updated their iconic Apex column stand, but the triangle column stand I was using looks dated (early 2000’s). It has a very strong “music gear” aesthetic, no getting around it. Just as I have always taped over the brand name on the back of the keyboard, I don’t like to scream “This is a modern-day digital instrument that I am playing.” The dual-keyboard triangle stand with optional microphone boom arm attachment was state of the art at one point, but it was starting to look kind of dumb to me.
- The dual-keyboard setup with a laptop stand beside was is a lot to stand behind when trying to engage people in worship. With close to 100 pounds of gear and over 200 keys and/or controllers between me and thecongregation, I found it hard to connect sometimes. If I was just playing keys in the background, I would feel differently. But trying to sing and connect with people behind all that gear is tough.
- Cables everywhere. The column stand is great for routing cables, and I had a homemade rack box right beside it to simplify and conceal as much as possible. But keeping clean cable runs into and out of the box was a constant bottle that I was always losing.
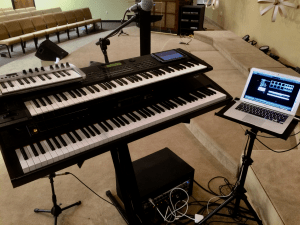
My previous setup, based on an Ultimate Support Apex triangle column stand.
So the challenge was to clean all this up into an aesthetically-pleasing rig that eliminated clutter and distractions.
After looking at some desk ideas on Pinterest, I decided to build a DIY keyboard stand out of black iron pipe with a wood top. I’ll explain the process below so you can try it yourself. You’ll need some basic woodworking skills and access to a few tools.
Short pipes and fittings
I ordered most of the black pipe and fittings from zoro.com. Here was my shopping list:

4 – 1″ Floor flange (for attaching the base to the stand top and for the “feet” of the stand – you could alternately use caps for the latter)
6 – 1″ Tee
4 – 1″ x 10″ Black pipe nipple (for the standing-height lower leg supports – you may want 12″ based on your height and preference)
6 – 1″ x 2″ Black pipe nipple (two for connecting the crossbar section, and four for sitting height lower leg supports; alternately, get substitute (4) 4″ lengths for the lower leg supports for a slightly higher sitting position)
Longer sections of pipe
The longer sections of the pipe came from the local Lowes store. It’s amazing that home improvement stores will often cut and thread pipe to customer specifications for free! I purchased a single 10-foot long pipe for less than $15 and handed it over to be cut and threaded.
The pipe length cuts I needed were:
4 – 14″ (for front uprights and front-to-back supports)
2 – 18 3/8″ (for back uprights – they need to be longer because they don’t have the tees and extra 2″ pipes the front of the stand has)
1 – 27+” (for the crossbar). This pipe should be cut last. Once the first six pipes have been cut, it should leave approximately 27 1/4″ of pipe. This is a good length for the crossbar, which is the least critical measurement of the whole project. An inch or two shorter is fine as well.
Other supplies
The cutting and threading process took about forty-five minutes, which was enough time for me to get the other supplies I needed:
1 – 8′ x 4′ sheet of 1/2″ plywood (nothing fancy since it was going to be painted and hidden under the keyboard)
Wood glue – get a fairly big bottle
A package of #12 1″ wood screws
A package of smaller 1″ wood screws (I don’t remember what # size, sorry. They just need to be fairly small. You will eventually use these for attaching the finished wood parts of the top. You’ll want them small so you can countersink them and cover the holes with wood filler.
1 – 8″ x 1″ x 8′ stain-grade poplar board
Can of wood stain – I used Minwax jacobean on my stand
Can of water-based polycrylic clear finishing coat, like this
A small amount of dark grey or black paint
A small amount of wood filler
You may have some spare lumber at home, but if not, pick up a standard 2″ x 4″ and 1″ x 4″. The former will be used as underside supports and the latter will be used as a trim piece to class up the exposed edge of the plywood. If the store won’t rip the boards (cut length-wise) for you, you will need to find a friend with a table saw. Have the 2″ x 4″ ripped in half to create two 2″ x 2″s and have 1″ ripped off the 1″ x 4″ to create the trim piece.
Cutting the plywood pieces
Once I had my items, I had to have the plywood cut to size (also free!). From the 8′ x 4′ sheet, I needed two sections of 20″ width and cut to the width of my keyboard. Be very sure of this measurement before you go to the store. I added a half inch to the width to create just enough extra space between my keyboard and sides of the stand.
One thing about the way this DIY keyboard stand is constructed that’s different than other stands is that it has a maximum keyboard width. If you make the stand 58″ wide and then you get a new keyboard that is 58 1/2″ wide, it won’t fit. Consider if you want a tight fit for your current keyboard or the flexibility to add a slightly wider keyboard in the future.
With the plywood cut, I went back to pick up my pipe, which was nearly complete. As I watched the last few pieces being threaded, I realized that there is a lot of oil used in the process. The oil was going to be something to wash off the pipes once I got home, but I would have to manage getting it home without creating an oily mess on myself or in my car. If you go this route, bring gloves with you to the store.
DIY keyboard stand assembly
With all the supplies ready, here were the steps for assembly:
Glue the two sheets of plywood together. My brother is much more handy than me, and he assisted me with some of these steps. I was very surprised to see him completely cover the surface of the plywood with the wood glue. He said it would help to strengthen the wood – the objective with using two sheets of plywood and gluing them together is to prevent sagging.
Using a mitre saw, I cut the trim piece to length.
I then cut the poplar board to create the front and sides of the case. I cut the front piece with enough length to cover the ends of the side pieces. You could do the opposite. Just make sure that you account for covering the edges. Also remember to account for the trim piece when cutting the length of the side pieces.
I cut the 2″ x 2″ support pieces to length, then angled the corners a bit to make them look nicer – they are quite visible from the sides.
I then attached the support pieces to the plywood, pre-drilling and creating countersinks for the screws. With those attached, I then primed and painted the plywood and supports.
After a light sanding, the poplar was ready for staining. I think everyone should stain a nice piece of wood at some point in their lives – it’s very gratifying!
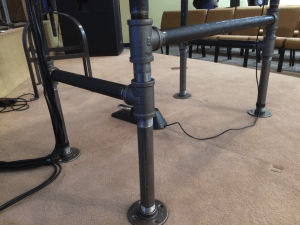
While the paint and stain dried, I assembled the iron pipe base. I recommend using a level at every point possible. You’d think that the pipes and fittings would automatically come out square and level, but I found that’s not necessarily the case. You may need to crank some connections down or unscrew others slightly in order to get things even.
Attaching the wood parts of the stand is a bit tricky to get right. I doing and redoing some steps 3-4 times. First, center the plywood on the base and use the #10 wood screws to attach it to the flanges. Next, assemble the poplar on the top, taking care to level each piece. I recommend using glue in addition to the smaller head wood screws. You will again need to pre-drill a hole for each screw as well as countersink them slightly. Attach the trim piece in the same manner.

With the DIY keyboard stand fully assembled, there are only a few more steps:
- fill the screw holes with wood filler
- second application of stain
- clear coat with the polycrylic
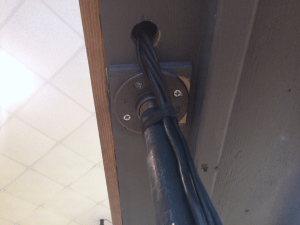
- holes for cables – use a 1 1/2″ or 1″ spade bit and drill from the bottom to get as close to the leg as possible. I drilled one hole for most of the cables and a small one for the sustain pedal cable.
Truth be told, my stand wasn’t stable after assembly. I had to detach the top from the base and add some extra wood pieces underneath the top to get the feet to all contact the floor. No one will confuse me for a master craftsmen, but I worked it out eventually!
Rock solid and clean

Along with a few small technology updates, the DIY keyboard stand achieved my goals.
- It created a much better aesthetic (not looking so music gear-ish),
- it cleaned up the cable runs greatly (moving my gear rack under a riser helped a lot, too),
- and it eliminated the worship leading distraction of the huge keyboard rig.
Extra benefits: the DIY keyboard stand is much more solid and stable than the column stand, which had quite a bit of up-and-down wobble as I played.
Plus, I’ve received a lot of compliments for it. Not bad for a keyboard player/handyman!